Skip to Main Content
CNSITMeK Content Creation Guide
Published on August 29, 2012 11:36 am MT Updated on September 3, 2025 3:54 pm MT
Information on the CNSITMeK Upload and Management Site can be found here:
https://cnsit.colostate.edu/kb/cnsitmek-upload-and-management-site
Current CNSITMeK Display Network Buildings
Biology Building
Chemistry Building
Chemistry Research Building
MRB Building
Anatomy/Zoology Building
Pinon Hall
General Display Information
Resolution: Content is delivered to the displays at a 1080p resolution. This translates to 1920 x 1080.
Aspect Ratio: 16:9
Display Size: 55″
Generic Requirements by Content Type
PowerPoint Slides: These must have an aspect ratio of 16:9. Photos that will be used in slides (and are designed to fill the screen) should be a resolution of 1920 x 1080. To create slides that will export (as .jpg) at a resolution of 1920 x 1080, you should set the aspect ratio of your slide show to 16:9 and set the height to 20 inches wide by 11.25 inches in height.
Slideshow Images: Images to be displayed as part of a slideshow must be of a certain quality. Nothing smaller than 600px should be used, as they will appear pixelated. Also, be sure to adjust the image so that it has the correct orientation – ie, the photo is not shown on its side.
Research Posters: As these must also have an aspect ration of 16:9 – we will need to specify height and width settings to match. The ratio that will work best on these displays is 27″ height by 48″ width. This will fill the screen fully. Also, you should be sure to use a minimum font size of around 36. Anything smaller that this will be difficult for some to read.
How to Submit Content
Individual slides can be submitted to the “Corkboard” display by anyone. There are specific guidelines to follow when creating your content. A content creation guide is provided below. Once you have your content slide, you may upload it using a web form located at the URL below. This URL is only available from on campus, or from off campus through the CSU Secure Gateway (https://cnsit.colostate.edu/kb/csu-vpn-duo):
Content Upload Page: https://cnsit.colostate.edu/mek/upload
How to Create Content
Anyone is able to submit content to be displayed on what is called a “Corkboard” display. Submitted content is evaluated and placed on the display(s) that will work best. For best results, please note the following:
- The slide content you submit must be an image file saved in the JPEG File Interchange Format (*.jpg or *.jpeg).
- For best results, your image should be exactly 1920 pixels wide and 1080 pixels high (a 16:9 aspect ratio).
- The easiest method for content creation is to use Microsoft PowerPoint.
Creating Slide Content using Microsoft PowerPoint
In these steps, we will assume you are using a current version of Microsoft Office.
Windows
- Select the proper image size
- On the Ribbon Menu, select the “Design” Menu tab.
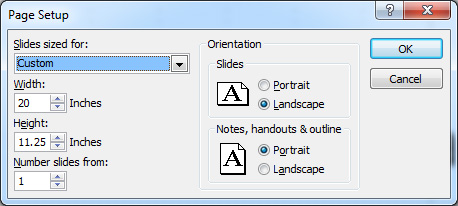
- From the Design Menu tab, select “Page Setup” button located on the far left.
- A screen will appear displaying two scroll menus. One labeled “Width” and the other labeled “Height”
- Change the width to 20 inches, and the height to 11.25 inches (this gives you an image size of the digital sign TV, 1920 pixels by 1080 pixels. Click the “OK” button. For large format research posters that are meant to be printed, the optimal width should be 48 inches and the height should be 27 inches.
- Now you will just need to create your slide content. Once it is complete you will save this slide as an image.
- Select the File Menu tab and choose “Save As”. A screen should appear asking for the name and file type in which you want to save your slide.
- Type in a name which you find relevant for the slide content, and then scroll down to the “JPEG File Interchange Format (*.jpg)” file type.
- After you click save, PowerPoint will display an option to export the entire slide show as individual images. You will select “Current Slide Only”.
You now have your slide content which is ready to be submitted!
MacOS
- Select the proper image size
- On the Ribbon Menu, select the “Themes” Menu tab.
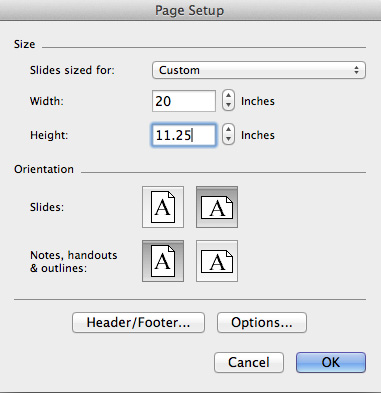
- From the Themes Menu tab, click “Page Setup” button located on the far left and select “Page Setup…”.
- A screen will appear displaying two scroll menus. One labeled “Width” and the other labeled “Height”
- Change the width to 20 inches, and the height to 11.25 inches (this gives you an image size of the digital sign TV, 1920 pixels by 1080 pixels). Click the “OK” button. You may get a warning about the current size exceeding the print area – you can disregard by once again clicking the “OK” button. For large format research posters that are meant to be printed, the optimal width should be 48 inches and the height should be 27 inches.
- Now you will just need to create your slide content. Once it is complete you will save this slide as an image.
- Select the File Menu item located at the top and choose “Save As Pictures…”.
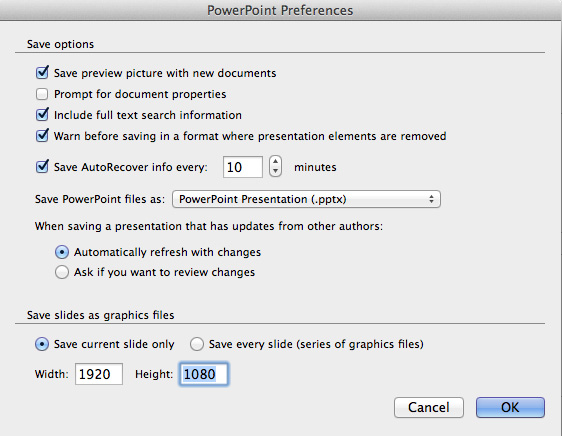
- Type in a name with an extension by adding “.jpg” to the end of your file name, and choose the “JPEG”, and then click “Options” button.
- At the bottom, make sure to choose the “Save Current Slide Only” radio button and set the Width to 1920 and the Height to 1080. Click the “OK” button.
- Now you can finally click on the “Save” button.
You now have your slide content which is ready to be submitted!
Consider QR Tags
If you have a web page that relates to some content you would like displayed, consider creating and including a QR tag. More information about QR tags can be found here: https://cnsit.colostate.edu/kb/what-are-qr-codes