Skip to Main Content

Connecting a Windows 10 computer to a Network Printer
By Ross Madden
Published on February 15, 2016 2:50 pm MT Updated on October 21, 2025 10:22 am MT Posted in General CNSIT, Knowledge Base, Printing
The following directions will instruct you on how to connect a Windows 10 computer to a network printer. A network printer is a printer that connects directly to the Internet via an Ethernet cable; it does not connect directly to another computer. In order to set up and print to a network printer, your computer must be connected to the Internet.
First, please refer to the following page so that you can be sure to get the proper information about the printer you are about to connect to:
https://cnsit.colostate.edu/kb/printer
1.) First, use the task bar search box located next to the start button and type “Printers”. Click on the “Printers & scanners” app that appears in the list.
2.) You should see a menu with a list of printers that are already installed on your computer. Click on the “Add a printer” button at the top.
3.) Your computer will now attempt to scan for printers on the network. It will begin listing out printers that it finds on the network and once it’s done you can click on the item at the bottom that says “The printer that I want isn’t listed”.
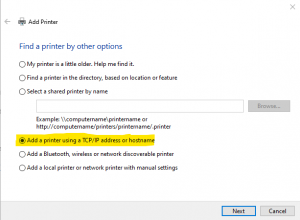
4.) On this new screen, select the third radio button option for “Add a printer using a TCP/IP address or hostname” as shown below:
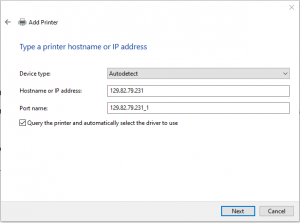
5.) Enter the following in on the next screen:
Device type: Set this to “Autodetect” if it’s not already
Hostname or IP address: Enter the IP Address you received from the instructions above
Port name: This will fill in automatically – you do not have to change this
Keep the checkbox for ‘Query the printer and automatically select the driver to use’ selected. Example of that menu filled out is below:
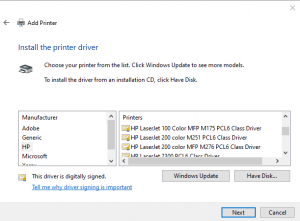
6.) At this point the install Wizard will have either found an appropriate driver automatically (will ask you for a printer name), or will be asking for you to select the make and model. If it asks for the make and model – first, select the Company name in the left and then the model in the right. If you do not see an exact match, select something that is similar enough – drivers are often universal between similar models. (You may also need to visit the manufacturer’s web site for the printer in order to download and install the correct driver – you may also use the CD that came with the printer at this stage). Click Next. An example of the driver selection screen is below:
7.) This might be an optional step, but if you are installing this on a CSU managed computer it will likely ask for Administrator credentials to install the printer driver. You can request LAPS credentials (see here for more information: https://cnsit.colostate.edu/kb/laps-local-adminstrator-password-solution) from CNSIT by submitting a CNSIT ticket at https://cnsit.colostate.edu/help. Be sure to include the name of the computer which will be located on a white label somewhere on the computer’s case.
8.) The next few options are arbitrary. It is recommended that you do not share your printer and it is also recommended that you print a test page to make sure the printer is working properly. Click Next and Finish until the Wizard completes.