Skip to Main Content
Configure OneDrive Client to Sync SharePoint Online
By Ross Madden
Published on January 28, 2019 11:32 am MT Updated on May 18, 2023 12:03 pm MT Posted in Apple, General CNSIT, Knowledge Base, The Cloud, Windows
In this article I will walk you through connecting a CSU M365 SharePoint Online site to your local computer using the OneDrive sync client. This walkthrough assumes you have already connected your OneDrive sync client to your personal OneDrive space as described in the following articles:
Configure OneDrive Client for Windows: https://cnsit.colostate.edu/kb/configure-onedrive-client-for-windows
Configure OneDrive Client for MacOS: https://cnsit.colostate.edu/kb/configure-onedrive-client-for-macos
This article also assumes you know the URL for the SharePoint Online site you wish to connect to. This will have been sent to you when the SharePoint Online site was created (contact CNSIT at https://cnsit.colostate.edu/help to request a SharePoint site) and should have a URL similar to the following, where SITE_NAME is the name of the SharePoint Online site:
https://colostate.sharepoint.com/sites/SITE_NAME
To begin, open up a web browser (built in browsers such as Safari on MacOS and MS Edge on Windows are preferred). Navigate your browser to the SharePoint Online site URL you wish to connect to and log in with your CSU M365 formatted credentials. Remember, to log in to CSU M365 resources, your username must be in the format NetID@colostate.edu.
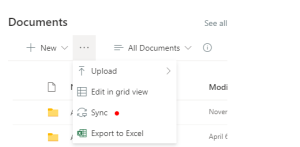
Once connected, you will notice a portion of the page where your site’s documents are listed. Select the three dots (…) button as illustrated by the screenshot below. This will initiate the connection to your local OneDrive sync client by first asking whether the browser has permission to access to open the OneDrive app. This may come across as a confirmation that you are switching apps, or if you allow the page to open the OneDrive app. In any case, you will need to grant that permission by selecting the “Yes” or “Allow” button.
From here, if you are using MacOS as your local operating system, you may be asked to log in and choose a location in the same way you connected your personal space. It is recommended that you keep the default location (if asked) for your SharePoint Online site to sync to.
If you are using Windows, you will most likely be met with a successful connection dialog (although you may also be asked to log in and choose a location), in which case you should be almost done!
An optional (but highly recommended step) is to also click on the “Follow” button for this SharePoint site, so that it is listed in the SharePoint page for your M365 account. For more information on this, check out the following article: https://cnsit.colostate.edu/kb/how-to-view-all-of-your-sharepoint-sites
The final step is to run the “Free up space” operation for your new SharePoint Online sync location. To do this, simply choose the “Colostate” folder in Finder (MacOS) or Explorer (Windows) and right click on your SharePoint Online folder you just added. Choose the “Free up space” menu item to begin the local cleanup. If you do not see this “Free up space” option in the menu, you should make sure On-Demand is enabled by revisiting the final steps in the OneDrive configuration steps linked to above.